Want to become an expert in VBA? So this is the right place for you. This blog mainly focus on teaching how to apply Visual Basic for Microsoft Excel. So improve the functionality of your excel workbooks with the aid of this blog. Also ask any questions you have regarding MS Excel and applying VBA. We are happy to assist you.

Fill a Listbox From an Array

In this lesson you will learn how to fill a Listbox from an array. Listboxes are a very useful control type available in the VBA toolbox. You can use the listboxes for search and view functions of the VBA programs. First let’s fill the listbox using a multidimensional array. After that we can try it with a one dimensional array. This is the sample Excel sheet I’m going to use for this lesson.

Sample data in an Excel worksheet

And here is the listbox we are going to fill with the array.

Listbox which we are going to fill with array

So we have data in three columns and fourteen rows. First, we are going to add this data to an array. After that we can add the array to our listbox in the VBA form. You might wonder why we need to add the data to an array. Because data can be directly added to the listbox from the worksheet using VBA. Yes it is possible. But here our objective is to learn how to add data to a listbox from an array. Because there are situations where we need to add the data which is not available in worksheets to listboxes using VBA. For example you might add data from a worksheet to one array. Then search through the elements of that array and create another array from the search results. Now you may want to show this second array in a listbox. So then you have to fill a listbox directly from an array using VBA. There can be various examples like this. But to make this lesson easy to understand, I’m going to use this simple example.

Here what we are going to do is we are going to show the data in the listbox when the VBA form is loaded. So we can add the VBA code to the UserForm_Initialize event.

Private Sub UserForm_Initialize()


End Sub

First we need to declare a few variables. Let’s assume the name of the worksheet is “Data”.

Dim WS_Data As Worksheet
Dim AllData(1 To 14, 1 To 3) As String
Dim i As Integer
Dim j As Integer

Here I have declared an array of the type string. Because I have only string type data in the Excel range. So you need to declare your array according to the type of data you have. If the data contains different data types then you should declare the array as type variant.

Next, assign the Excel sheet to the WS_Data variable.

Set WS_Data = Worksheets("Data")

Now we can add the data from the worksheet to the array. There are a few different ways to do this. Here is one method.

For i = 1 To 14
     For j = 1 To 3
         AllData(i, j) = WS_Data.Cells(i, j).Value
     Next j
Next i

This post explains a quicker way to create an array from an Excel range.
Quick Multidimensional Array from Excel Range

Next step is to set the column count. If you don't set the column count then the listbox will have only one column. Assume the name of the listbox is “lstNameEmailList”. In the conventional naming method we add “lst” in the beginning of the listbox name.

lstNameEmailList.ColumnCount = 3
Now we can assign width for each column. This step is optional. If you skip this step all the columns will have the same width.
lstNameEmailList.ColumnWidths = "100;100;250"

Finally we can add the array to the listbox using the “List” method as follows.

lstNameEmailList.List() = AllData

Below is the full VBA code of the UserForm_Initialize event.

Private Sub UserForm_Initialize()

     Dim WS_Data As Worksheet
     Dim AllData(1 To 14, 1 To 3) As String
     Dim i As Integer
     Dim j As Integer

     Set WS_Data = Worksheets("Data")

     For i = 1 To 14
         For j = 1 To 3
             AllData(i, j) = WS_Data.Cells(i, j).Value
         Next j
     Next i

     lstNameEmailList.ColumnCount = 3

     lstNameEmailList.ColumnWidths = "100;100;250"

     lstNameEmailList.List() = AllData

End Sub

Now data will be shown in the listbox when the userform is loaded.
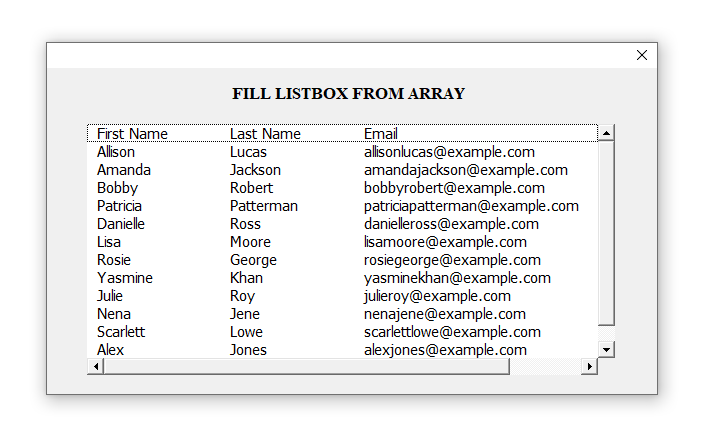
Listbox is filled with the data from the array

So we learnt how to fill a listbox from a multidimensional array in VBA. Next let’s try to fill this listbox with a one dimensional array.

Assume we have a one dimensional array like this.

Dim OneEmployeeInfo(1 To 3) As String

OneEmployeeInfo(1) = "Cathrine"
OneEmployeeInfo(2) = "Wintour"
OneEmployeeInfo(2) = "cathrinewintour@example.com"
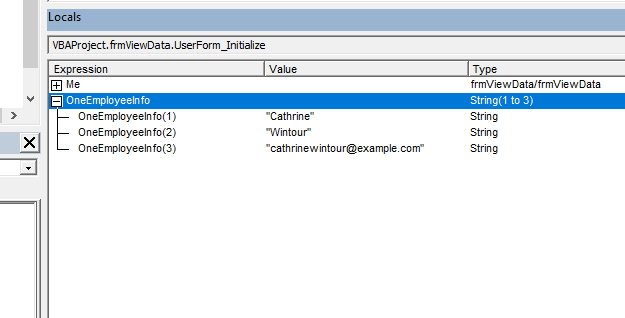
One dimensional array

We can add this array to our listbox easily inside the UserForm_Initialize event as follows.

Private Sub UserForm_Initialize()

     Dim OneEmployeeInfo(1 To 3) As String

     OneEmployeeInfo(1) = "Cathrine"
     OneEmployeeInfo(2) = "Wintour"
     OneEmployeeInfo(3) = "cathrinewintour@example.com"

     lstNameEmailList.ColumnCount = 3

     lstNameEmailList.ColumnWidths = "100;100;250"

     lstNameEmailList.List() = OneEmployeeInfo

End Sub

Below is the result you will get when the VBA form is shown.

Listbox is filled with the data from a one dimensional array

Here the data is listed in one column even though I have set the column count as 3. I faced a similar problem when I developed a VBA application recently. That program had a class module function which returns an array. Sometimes it returns a multidimensional array and sometimes a one dimensional array. Then the data of this returned array was shown to the user through a listbox. But as in above, listbox showed the data in a single column when the class module returned a one dimensional array. But I wanted to show the data horizontally when there is one row.

So how can we solve this problem? How to show the data horizontally in multiple columns instead of in a one column? For that you have to convert the one dimensional array to a multidimensional array. You can follow below steps to convert a one dimensional array to a multidimensional array in VBA.

Private Sub UserForm_Initialize()

     Dim OneEmployeeInfo(1 To 3) As String

     OneEmployeeInfo(1) = "Cathrine"
     OneEmployeeInfo(2) = "Wintour"
     OneEmployeeInfo(3) = "cathrinewintour@example.com"

     Dim OneEmp_Multidimensional_Arr(1 To 1, 1 To 3) As String

     For i = 1 To 3
         OneEmp_Multidimensional_Arr(1, i) = OneEmployeeInfo(i)
     Next i

     lstNameEmailList.ColumnCount = 3

     lstNameEmailList.ColumnWidths = "100;100;250"

     lstNameEmailList.List() = OneEmp_Multidimensional_Arr

End Sub
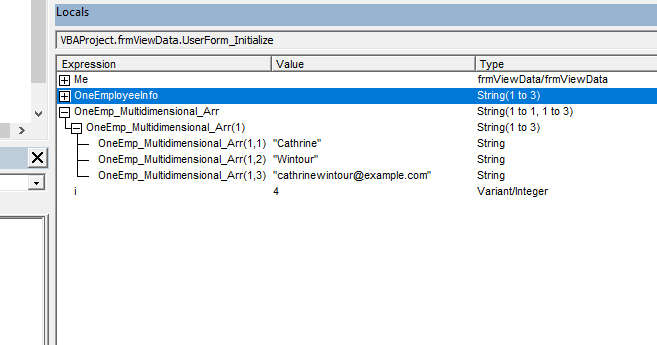
Multidimensional array

Now when we show the VBA form using the form.show method, the listbox will be filled with the data like this.

Listbox is filled with the data from the multidimensional array

Want to learn more about arrays? Then check these posts.
Fixed Size Arrays in VBA
Multidimensional Arrays in VBA
Dynamic arrays in VBA
Calculate With Arrays

How to Return an Array From VBA Function

Today I’m going to show you how to return an array from a VBA function. VBA functions can return arrays of any data type. But sometimes we need to return arrays with elements of different data types. Luckily we can do it using the variant data type. I will show how to return an array of type variant in an example. Let’s start with a simple example. Assume we want to create a VBA function which returns 3 random numbers between 1 and 100. The VBA function can return these 3 numbers as an array. We can use the inbuilt function called Rnd to generate a random number. Then we can do some additional calculations and use the VBA Int function to get a number between 1 and 100. Here is how you can do it.

Function ThreeRandomNumbers() As Integer()

     Dim ResultArr(2) As Integer

     ResultArr(0) = Int(Rnd * 100) + 1
     ResultArr(1) = Int(Rnd * 100) + 1
     ResultArr(2) = Int(Rnd * 100) + 1

     ThreeRandomNumbers = ResultArr

End Function

Rnd function return values similar to this.

0.8626193
0.7904852
0.3735362

So I multiplied those numbers by 100.

86.26193
79.04852
37.35362

And the VBA Int function returns the integer part of the number. So finally we get random numbers like below.

86
79
37

Rnd function returns values equal or greater than 0 and less than 1. Then Int(Rnd * 100) will output numbers from 0 to 99. Therefore we have to add 1 to get a random number between 1 and 100.

Int(Rnd * 100) + 1 => Generates integer values between 1 and 100

Now we have a VBA function which can return an array. Let’s see how we can call this function within a subroutine. Data type of the array returned by our function is integer. So we need an array of the type integer inside our subroutine. Then we can assign the function’s return value to that array.

Sub Test1()

     Dim RandomNumbers() As Integer

     RandomNumbers = ThreeRandomNumbers()

End Sub

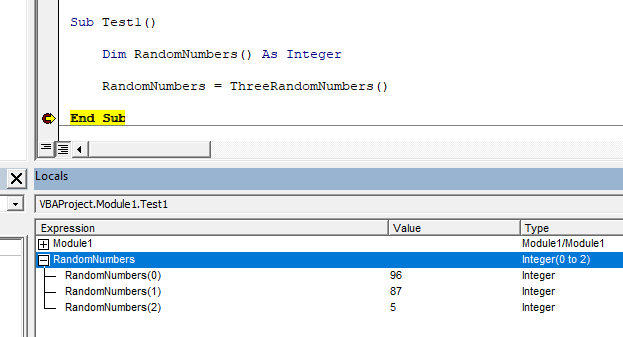
Add a breakpoint at End Sub and run the subroutine. Then you will see the result in the Locals window like this.

View the array returned by the function in the Locals window

Also you can print these values to an Excel sheet as well. If the name of the worksheet is “Sheet1” then you can write the array to the worksheet as follows.

Sub Test2()

     Dim WS As Worksheet
     Dim RandomNumbers() As Integer
     Dim i As Integer

     Set WS = Worksheets("Sheet1")
     RandomNumbers = ThreeRandomNumbers()

     For i = 0 To 2
          WS.Range("A1").Offset(i, 0).Value = RandomNumbers(i)
     Next i

End Sub

Here is the result of the Test2 subroutine.

Write the returned array of the function to a worksheet

Next let’s look at another example where we need to pass arguments to the VBA function. Assume we need to find 5 powers/exponents of a given number. For an example if the given number is 3 then the VBA function should return 1,3,9,27 and 81 (30,31,32,33,34)

Here we have to pass the given number as an argument to the function. Then the function can return 5 exponents of the number as an array.

Function FiveExponents(GivenNumber As Integer) As Integer()

     Dim ResultArr(4) As Integer

     ResultArr(0) = GivenNumber ^ 0
     ResultArr(1) = GivenNumber ^ 1
     ResultArr(2) = GivenNumber ^ 2
     ResultArr(3) = GivenNumber ^ 3
     ResultArr(4) = GivenNumber ^ 4

     FiveExponents = ResultArr

End Function
.

Now we can call this function within a subroutine like this.

Sub Test3()

     Dim WS As Worksheet
     Dim Exponents() As Integer
     Dim i As Integer

     Set WS = Worksheets("Sheet1")
     Exponents = FiveExponents(5)

     For i = 0 To 4
          WS.Range("A1").Offset(i, 0).Value = Exponents(i)
     Next i

End Sub

Below is the outcome of the above subroutine.

VBA function returned five exponents of the given number as an array

Above functions output arrays of integer data type. So the returned array consists of only integers. But sometimes we need VBA functions which should return arrays with elements of various data types. They may contain values of data types such as integer, string, boolean etc. Here is an example.

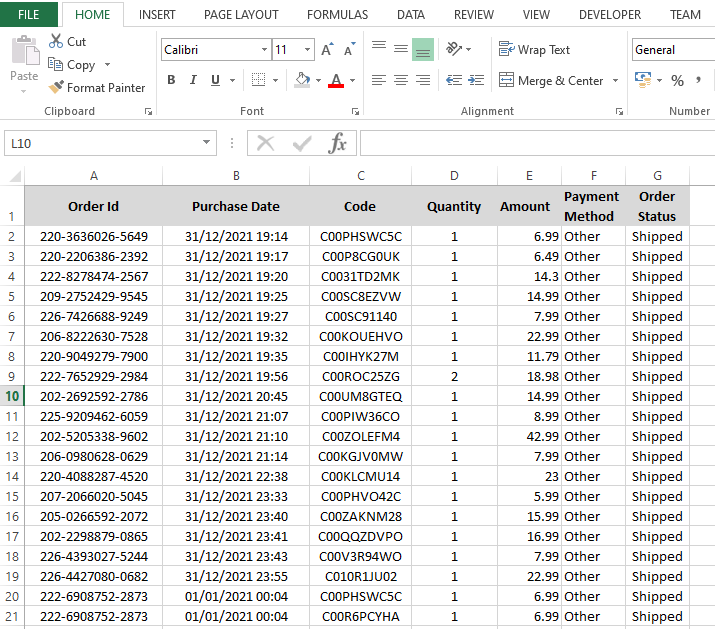
Sample data sheet

This worksheet contains order information of a shop. Assume we need a VBA function which takes an order id as an argument and then returns all the other information of that order as an array. It is a type of function we need when searching data. So here various columns have various data types. Therefore we need to declare the data type of the return value of the function as the variant.

This is the function developed for the above requirement.

Function GetOrderInformation(OrderId As String) As Variant

     Dim WS As Worksheet
     Dim WS_LastRow As Long
     Dim i As Long
     Dim j As Integer
     Dim ResultArr(6) As Variant

     Set WS = Worksheets("Order Details")

     WS_LastRow = WS.Cells.Find("*", [A1], , , xlByRows, xlPrevious).Row

     For i = 2 To WS_LastRow
          If StrComp(WS.Range("A" & i).Value, OrderId, vbTextCompare) = 0 Then
               For j = 0 To 6
                    ResultArr(j) = WS.Range("A" & i).Offset(0, j).Value
               Next j
               Exit For
          End If
     Next i

     GetOrderInformation = ResultArr

End Function

First we find the last row of the worksheet. Then use For Next Statement to iterate through the rows. Strcomp function is used to find the matching row for the given order id. If a matching row is found then all the information of that row is written to an array.

Here is how you can call the above function inside a subroutine.

Sub Test4()

     Dim OrderInfo() As Variant

     OrderInfo = GetOrderInformation("209-2752429-9545")

End Sub

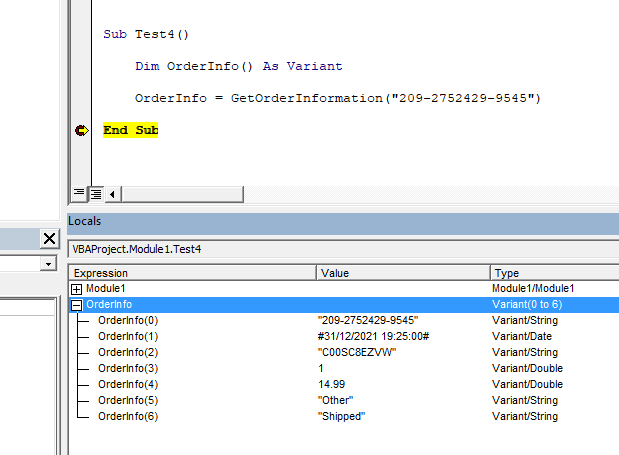
Add a breakpoint at End Sub and run the macro. Then you can view the OrderInfo array in the Locals window.


Array of type variant returned by the function

Also read
Quickly Write Multidimensional Array to Excel Range
Re-size Dynamic Arrays
Calculate With Arrays
How to use preserve keyword in arrays
Transposing an Array in VBA

Clear Sheet Using VBA

In this post you will learn how to clear a sheet using VBA. Excel sheets can contain various elements and objects. So I will show you how you can clear these various items using VBA. You will learn how to clear a specific range or an entire sheet. Also you will learn how to clear things from an active sheet or a specific sheet. Inbuilt clear methods don't allow us to delete shapes. So at the end I will show how to create our own VBA code to delete objects such as charts, shapes etc. To explain about these various methods I will use this sample Excel sheet.

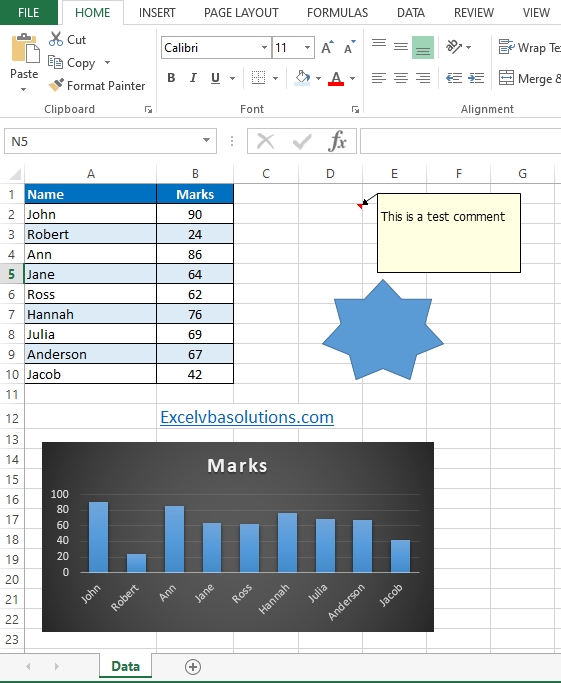
Sample excel sheet

This Excel sheet consists of text, values, hyperlink, chart and a star. Also some formattings are applied to the sheet such as colors and borders.

There are various ways to clear Excel sheets. But not all the methods can be used to clear all the things from the sheet. So let’s see how we can use these different methods and their outcomes.

Here is the first method you can use to clear an Excel sheet using VBA.

Sub ClearSheet_Example1()

     Cells.Clear

End Sub

In this method we haven’t specified a sheet. So the clear method will be applied to the active sheet. If you run the above VBA code, contents, formats, comments and hyperlinks will be deleted from the active sheet. But the shapes and charts will not be deleted. If the source data of the chart is in the same sheet, then the chart will be blanked. This is what happened to our sample Excel sheet after running above code. (In our sample excel sheet, source data of the chart was in the same sheet.)

Result of Cells.Clear method

Next let’s look at how to modify the above VBA code to clear a specific sheet from a workbook. Assume we have a workbook with multiple worksheets and we need to clear the sheet called “Order Details”. You can modify the above subroutine to clear the “Order Details” sheet as follows.

Sub ClearSheet_Example2a()

     Worksheets("Order Details").Cells.Clear

End Sub

If you want, you can declare a variable of type worksheet and then assign this worksheet to the variable and clear it as well.

Sub ClearSheet_Example2b()

     Dim WS As Worksheet

     Set WS = Worksheets("Order Details")

     WS.Cells.Clear

End Sub

Also the Clear method can be used to clear a specific range of a worksheet. Following subroutine will clear the range A6:B10 of the activesheet.

Sub ClearSheet_Example3()

     Range("A6:B10").Clear

End Sub

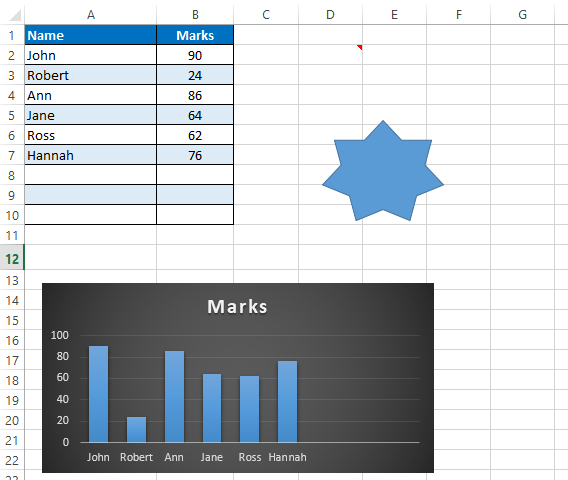
This is what happened to our sample worksheet after running the above macro.

Clear a range of an excel sheet using VBA

In the above examples we cleared everything except shapes and charts. However if you want you can clear only particular things from an Excel sheet or a range. Here is the list of things you can clear using VBA, without clearing everything.

  • Comments
  • Contents
  • Formats
  • Hyperlinks
  • Notes
  • Outlines

Now let’s look at how to clear each of these things separately.

Following subroutine will clear all the comments of the active sheet.

Sub ClearComments()

     Cells.ClearComments

End Sub

You can use the below macro to clear the contents from range A8:B12.

Sub ClearContents()

     Range("A8:B12").ClearContents

End Sub
Only contents are removed keeping the formats

Only contents are removed from that area keeping the table formats.

Also we can clear only formats from the whole sheet or specific range of a sheet. This next macro will clear all the formats from the table (range A1:B10) of the “Data” sheet.

Sub ClearFormats()

     Worksheets("Data").Range("A1:B10").ClearFormats

End Sub

Here is the result of the above subroutine.

Only formats are cleared from the specified range

Sometimes you may want to remove the hyperlinks of the entire sheet or from a range of cells using VBA. For that you can use the ClearHyperlinks method as follows.

Sub ClearHyperlinks()

     Cells.ClearHyperlinks

End Sub

Above macro will remove all the hyperlinks of the activesheet. However note that the formattings and the text of the hyperlinks will not be removed. Only the link will be removed.

Here is how to clear all the notes of the Excel sheet using VBA.

Sub ClearNotes()

     Cells.ClearNotes

End Sub

Next let’s look at how to clear the outline from an Excel sheet. Assume we have an outline like this in our worksheet.

Outline

Here we have grouped rows from 2 to 10 using an outline. We can remove this outline automatically using the ClearOutline method as follows. Name of the worksheet is “Data”.

Sub ClearOutline()

     Worksheets("Data").Cells.ClearOutline

End Sub
Outline was cleared using ClearOutline method

So far we learnt various ways to clear sheets. But none of them were able to delete the objects such as shapes, charts etc. Inbuilt clear methods don’t clear these objects from the sheet. We need to create our own code to delete these items. Next let’s look at how to delete these objects from a worksheet automatically using VBA. To do this we need to iterate through each and every shape using a For Each loop and delete them. Here is the code to delete all the shapes from the active sheet.

Sub DeleteAllObjects()

     Dim Sh As Shape

     For Each Sh In ActiveSheet.Shapes
         Sh.Delete
     Next

End Sub

If we run this subroutine in our sample Excel sheet, the result will look like this.

All the shapes are deleted from the sheet

Check this post if you want to learn more about manipulating shapes using VBA.

Shapes

We can also add the Clear method to this subroutine. Then everything will be cleared from the sheet.

Sub ClearEverything()

     Dim Sh As Shape

     For Each Sh In ActiveSheet.Shapes
         Sh.Delete
     Next

     Cells.Clear

End Sub
Everything was cleared from the worksheet

Above macro will clear everything in the activesheet. You can also modify the above VBA code to clear everything from a specific sheet as well. Assume we want to clear everything from a sheet called “Data”. For that we can easily modify the above subroutine as follows.

Sub ClearEverything_SpecificSheet()

     Dim WS As Variant
     Dim Sh As Shape

     Set WS = Worksheets("Data")

     For Each Sh In WS.Shapes
         Sh.Delete
     Next

     WS.Cells.Clear

End Sub

Check If Sheet Exists Using VBA

In this post you will learn how to check whether a particular worksheet exists inside a workbook. There are few different ways to check it. I will show you two methods here. In both methods we are going to use the name of the worksheet to identify the existence. First method will use a string comparison function and the second method will use an error handling technique.

Here is a sample workbook which contains a few worksheets.

Sample workbook with 3 sheets

Method 1

This workbook has three worksheets. Names of the worksheets are “Input”, “Tmp” and “Output”. Assume we want to check if sheet “Tmp” exists inside this workbook. Here is the first function you can use to check that.

Function IsSheetExist(WB As Workbook, SheetName As String) As Boolean

     Dim WS As Worksheet

     For Each WS In WB.Worksheets
          If StrComp(SheetName, WS.Name, vbTextCompare) = 0 Then
               IsSheetExist = True
               Exit Function
          End If
     Next WS

End Function

And this is how you can call this function from a subroutine.

Sub Test_1()

     Dim WB_Data As Workbook
     Dim Result As Boolean

     Set WB_Data = ActiveWorkbook

     Result = IsSheetExist(WB_Data, "Tmp")

     MsgBox Result

End Sub

If you run the macro when the “Tmp” sheet is available inside the workbook then you will see this message box.

Result of first function when sheet is available

This is the result you will see when there is no “Tmp” sheet.

Result of first function when sheet is not in the workbook

Below is the explanation for the first function.

This function has two parameters. And the data type of the return value is boolean.

Function IsSheetExist(WB As Workbook, SheetName As String) As Boolean

Function uses a For Each Next statement to iterate through the sheets of the given workbook.

For Each WS In WB.Worksheets

Next WS

StrComp function is used to compare the given name with each and every sheet name.

If StrComp(SheetName, WS.Name, vbTextCompare) = 0 Then

End If

Learn more about StrComp function

If a match is found then the function will return the value “True” and exit.

For Each WS In WB.Worksheets
     If StrComp(SheetName, WS.Name, vbTextCompare) = 0 Then
          IsSheetExist = True
          Exit Function
     End If
Next WS

If the function is unable to find a matching sheet name inside the For Each Next statement, the code will be executed until the “End Function” line. Then the function will return false as the default value of a VBA function is false.

Method 2

In this method we are going to use error handling techniques to check if a sheet exists in a workbook. Below is the complete code for the second function.

Function IsSheetExist(WB As Workbook, SheetName As String) As Boolean

     Dim WS As Worksheet

     On Error Resume Next
     Set WS = WB.Worksheets(SheetName)

     If Err <> 0 Then
          IsSheetExist = False
     Else
          IsSheetExist = True
     End If

     On Error GoTo 0

End Function

You can call this function from a subroutine same as we did above for the first function.

Set WS = WB.Worksheets(SheetName)

If there is no sheet named as SheetName then the above line will generate an error like this.

Run time error

To prevent that run-time error “On Error Resume Next” statement is used before that line. So the program will execute the next lines without raising the error. Next the below part will identify whether there is an error or not and output return value for the function accordingly.

If Err <> 0 Then
     IsSheetExist = False
Else
     IsSheetExist = True
End If

In VBA we use <> for not equal. It is the opposite of = symbol. So Err<>0 means error is not equal to zero. So there is an error. Then we can decide that the error occurred due to there not being such a sheet. So we return false for the function. Else we can return true.

So we learnt two different ways to check if a sheet exists inside a workbook. Sometimes we have to take some other actions after checking the existence of a particular sheet. Now let’s look at a few examples where we need to take another action after checking the existence of a sheet.

Check if sheet exists and delete using VBA

Sometimes you may need to check whether a particular sheet exists and then delete it if it exists. Here is one way to do it.

Function DeleteIfSheetExist(WB As Workbook, SheetName As String) As Boolean

     Dim WS As Worksheet

     For Each WS In WB.Worksheets
          If StrComp(SheetName, WS.Name, vbTextCompare) = 0 Then
               Application.DisplayAlerts = False
               WS.Delete
               Application.DisplayAlerts = True
               Exit Function
          End If
     Next WS

End Function

You can call the above function inside a subroutine like this.

Sub Test_3()

     Dim WB_Data As Workbook

     Set WB_Data = ActiveWorkbook

     Call DeleteIfSheetExist(WB_Data, "Tmp")

End Sub

You might wonder why you need to check the existence of the sheet. You can delete the sheet straight away. Then if an error raises when there is no sheet with that name you can use “On Error Resume Next” to proceed without any interruption. Actually you can delete the sheet without checking its existence. But the problem is that errors can be raised due to different other reasons. For example, an error can be raised if you try to delete a sheet of a protected workbook. However there is a turnaround for that as well. You can identify the reason for the runtime error using the err number and then develop the code accordingly.

If sheet does not exist skip

Sometimes you may need to skip some processes if a sheet does not exist. For an example assume you want to call another subroutine if a sheet exists and skip if it doesn’t.

Sub CallAnotherSubIfSheetExist()

     Dim WB As Workbook
     Dim WS As Worksheet
     Dim SheetName As String

     Set WB = ActiveWorkbook
     SheetName = "Tmp"

     On Error Resume Next
     Set WS = WB.Worksheets(SheetName)

     If Err <> 0 Then
          'Do nothing
     Else
          On Error GoTo 0
          Call OtherSub
     End If

     On Error GoTo 0

End Sub

Also you can shorten the above if statement section like this as well.

Sub CallAnotherSubIfSheetExist()

     Dim WB As Workbook
     Dim WS As Worksheet
     Dim SheetName As String

     Set WB = ActiveWorkbook
     SheetName = "Tmp"

     On Error Resume Next
     Set WS = WB.Worksheets(SheetName)

     If Err = 0 Then
          On Error GoTo 0
          Call OtherSub
     End If

     On Error GoTo 0

End Sub

Clear Contents of Excel Sheet Except First Row Using VBA

In this post you will learn how to clear the contents of Excel sheet except the first row using VBA. This is a very common requirement for Excel VBA applications. Because VBA applications often need to clear existing reports and re-generate them. When doing this, the program doesn’t need to delete the header row. Because it is the same for the new reports. Also there may be some other situations where you want to develop a VBA code to delete content from the Excel sheet except the first row. For example, sometimes users may need to clear the existing result sheets except the header using buttons.

So now let’s look at how to develop a code to delete the worksheet contents without header row.

Let’s consider this sample worksheet. Name of the worksheet is “Order Information”.

Sample worksheet in which we need to clear contents except header row

There are few different ways to accomplish this. I will explain two methods in this post. You can use the first method if you know the last column you have data in. In the above sample sheet we have data upto column E. If you don’t know what the last column is or if the last column changes from time to time then you should use the second method shown at the end.

This is the complete code of the first method.

Sub DeleteContentsExceptHeader()

     Dim WS As Worksheet
     Dim LastRow As Long

     Set WS = Worksheets("Order Information")

     LastRow = WS.Cells.Find("*", [A1], , , xlByRows, xlPrevious).Row

     If LastRow > 1 Then
         WS.Range("A2:E" & LastRow).ClearContents
     End If

End Sub

This is the result you will get when run the subroutine.

Result worksheet only has headers

Here is the explanation for the first subroutine.

First we need to define two variables

Dim WS As Worksheet
Dim LastRow As Long

Next, assign the worksheet to the WS variable.

Set WS = Worksheets("Order Information")

Find the last row of the worksheet

LastRow = WS.Cells.Find("*", [A1], , , xlByRows, xlPrevious).Row

Next we need to check whether the last row is greater than 1. If it is greater than 1, then we can clear the contents using the Range.ClearContents method.

If LastRow > 1 Then
     WS.Range("A2:E" & LastRow).ClearContents
End If

It is important to check whether the last row is greater than 1, because otherwise the “WS.Range("A2:E" & LastRow).ClearContents” statement will delete the header row if there is no data after row 1.

Now let’s move to the second method. As mentioned earlier, you can use this method if you don’t know the last column of the data or if the last column changes from time to time. Below is the complete code of the second method.

Sub DeleteContentsExceptHeader_Method2()

     Dim WS As Worksheet
     Dim LastRow As Long

     Set WS = Worksheets("Order Information")

     LastRow = WS.Cells.Find("*", [A1], , , xlByRows, xlPrevious).Row

     If LastRow > 1 Then
         WS.Rows("2:" & LastRow).ClearContents
     End If

End Sub

In this method we are deleting entire rows from row number two to the last row. It is important to use If Statement (If LastRow > 1 Then) to avoid deletion of the first row in case there is no data after row 1.

How to Search For Multiple Strings Using VBA InStr Function

In the previous post we learnt how to use the InStr function to check whether a string contains a substring. Today I’m going to show you how to search for multiple strings using the VBA InStr function. For an example consider this sample string.

“Learn to develop Excel VBA applications”

Assume you want to check whether this string contains either Excel or VBA. We can’t use the InStr function as it is, to search for multiple values. But we can create our own function using the InStr function to do the job. I’m going to develop two types of solutions to search for multiple values using the VBA InStr function. One function will return true or false depending on whether it can find at least one of the multiple strings or not. And the other function will return the positions of each and every substring. So stay tuned.

Function 1 - Return true or false depending on whether at least one of the multiple values are available or not.

This function needs two input parameters. The string being searched and the multiple strings. Below is the complete code of the first function.

Function MultipleStringsSearch(SText As String, MultipleStrings() As String) As Boolean

     Dim i As Integer

    For i = LBound(MultipleStrings) To UBound(MultipleStrings)
        If Len(MultipleStrings(i)) > 0 Then
            If InStr(1, SText, MultipleStrings(i), vbTextCompare) > 0 Then
                MultipleStringSearch = True
                Exit Function
            End If
        End If
    Next i

End Function

Below is the explanation of the above code.

Here we pass the multiple values to the function as an array. Also this function returns either true or false. So the data type of the returned value is boolean.

Function MultipleStringsSearch(SText As String, MultipleStrings() As String) As Boolean

Then a For Next statement is used to iterate through each element of the MultipleStrings array.

For i = LBound(MultipleStrings) To UBound(MultipleStrings)

Next i

We should check whether the length of each string is higher than 0. Because the InStr function returns the start value when the length of the search string is 0. Click the link below to see more details.

InStr function return Start value when length of second string is 0

If Len(MultipleStrings(i)) > 0 Then

Then the InStr function is used to check whether the SText string contains each substring of the MultipleStrings array.

If InStr(1, SText, MultipleStrings(i), vbTextCompare) > 0 Then

Now let’s see how to call this function in subroutines.

Let’s use a somewhat long string as the first string. This will be the string being searched.

MyString = "When we develop Excel VBA applications sometimes we need the application to check whether some strings are included in other strings."

And the multiple strings we are searching for are “we”, “Excel” and “applications”.

Sub Test_1()

     Dim MyString As String
     Dim StringsArr(2) As String

     MyString = "When we develop Excel VBA applications sometimes we need the application to check whether some strings are included in other strings."

     StringsArr(0) = "we"
     StringsArr(1) = "Excel"
     StringsArr(2) = "applications"

     Debug.Print MultipleStringsSearch(MyString, StringsArr)

End Sub

In this subroutine, a fixed size array is declared to contain the multiple strings.

Dim StringsArr(2) As String

And then added the multiple strings to that array as follows.

StringsArr(0) = "we"
StringsArr(1) = "Excel"
StringsArr(2) = "applications"

Want to learn more about fixed size arrays? Check this post.

Fixed Size Arrays in VBA

This is the output of the Test_1 subroutine.
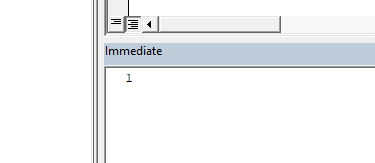
Function returns true as it found multiple strings inside the first string

Here is the second example.

Sub Test_2()

     Dim MyString As String
     Dim StringsArr(2) As String

     MyString = "I went to home"

     StringsArr(0) = "Excel"
     StringsArr(1) = "vba"
     StringsArr(2) = "application"

     Debug.Print MultipleStringsSearch(MyString, StringsArr)

End Sub

As you can see the multiple strings are not found inside the MyString. So the output of the Test_2 subroutine is false.

Function returns false as it can't find any of the multiple strings

In the above two examples, multiple strings were added to the StringsArr array one by one. However if you have the multiple values in a one string separated by commas, then you can use Split function to convert it to an array easily. See the below example.

Sub Test_3()

     Dim MyString As String
     Dim MultipleStrings As String
     Dim StringsArr() As String

     MyString = "When we develop Excel VBA applications sometimes we need the application to check whether some strings are included in other strings."

     MultipleStrings = "Excel,vba,application"

     StringsArr = Split(MultipleStrings, ",")

     Debug.Print MultipleStringsSearch(MyString, StringsArr)

End Sub

This is the output of the Test_3 subroutine.

Function returns true as it found multiple values

Function 2 - Return the positions of each multiple string

Previous function returned true or false depending on whether the multiple values are available inside the string being searched or not. But this new function returns the position of each multiple string inside the main string. For example if the multiple strings are found inside the main string at the positions x, y and z then the function will return x,y,z in an array.

Function InStrResultForMultipleStrings(SText As String, MultipleStrings() As String) As Variant

     Dim i As Integer
     Dim ResultArr() As Variant
     Dim iStart As Integer
     Dim iEnd As Integer

     iStart = LBound(MultipleStrings)
     iEnd = UBound(MultipleStrings)
     ReDim ResultArr(iStart To iEnd)

     For i = LBound(MultipleStrings) To UBound(MultipleStrings)
         ResultArr(i) = InStr(1, SText, MultipleStrings(i), vbTextCompare)
     Next i

     InStrResultForMultipleStrings = ResultArr()

End Function

Input parameters for this second function are the same as the previous function. However this function returns a value of the variant data type instead of the boolean. Following example shows how to call this function within a subroutine.

Sub Test_4()

     Dim MyString As String
     Dim StringsArr(2) As String
     Dim Result() As Variant

     MyString = "Excel formulas and vba macros"

     StringsArr(0) = "Excel"
     StringsArr(1) = "vba"
     StringsArr(2) = "application"

     Result = InStrResultForMultipleStrings(MyString, StringsArr)

End Sub

Then set a breakpoint at the end of the subroutine and run the macro to see the result in the Locals window.

Set a breakpoint
See the Result array in the locals window

Word “Excel” is at the position 1 within the MyString and “vba” is at position 20. Also the substring "application" is not available inside the MyString. So the function returns 0 for that substring.

Also note that above two functions carry out a case insensitive search. If you want to do case sensitive search for multiple strings then change the compare type from “vbTextCompare” to “vbBinaryCompare”. So the first function should be changed like this.

Function MultipleStringsSearchCaseSensitive(SText As String, MultipleStrings() As String) As Boolean

     Dim i As Integer

     For i = LBound(MultipleStrings) To UBound(MultipleStrings)
         If Len(MultipleStrings(i)) > 0 Then
             If InStr(1, SText, MultipleStrings(i), vbBinaryCompare) > 0 Then
                 MultipleStringsSearch = True
                 Exit Function
             End If
         End If
     Next i

End Function

You can do the same for the second function as well.

How to Check If String Contains an Another String - VBA

When we develop Excel VBA applications sometimes we need the application to check whether some strings are included in other strings. So in this lesson you will learn how to check if a string contains a substring using the VBA InStr function.


InStr function

The InStr function has four parameters. Two optional and two required parameters. This is the syntax of the InStr function.

InStr([start], FirstString, SecondString, [CompareMethod])

Start - This is the starting point of the first string where you want to begin searching for the second string. If omitted, the function will search from first position.

FirstString - Function will search through this string to find the second string.

SecondString - This is the string the InStr function will search for.

CompareMethod - There are three options for this parameter. vbBinaryCompare, vbDatabaseCompare and vbTextCompare. But vbDatabaseCompare is only used for Microsoft Access. So you can use either vbTextCompare or vbBinaryCompare for Excel VBA Macros. If you select vbBinaryCompare then the VBA InStr function will carry out a binary comparison. So the function will see “A” and “a” as different. But if you choose vbTextCompare then the InStr function will carry out a textual comparison and it will see “A” and “a” as the same. You will get a clear understanding about these different types of comparisons from the examples below.

Return values of VBA InStr function

There are four types of return values for this function. Click on the links to see related examples.

0 - Second string is not found or Length of first string is 0 or Starting point is higher than length of first string or Starting point is higher than the occurrence position of the second string.

Null - First string is null or Second string is Null or both are Null

Start - Length of second string is 0

Position at first string where match is found - When second string is found within first string

Now let’s look at examples where we will get those return types.

Return 0

Second sting is not found
Sub Example_1()

     Debug.Print InStr(1, "Excel VBA Solutions", "PHP", vbTextCompare)

End Sub
Return 0 when string2 is not found
Length of first string is 0

In this example Len(String1) equals 0. So the function returns 0.

Sub Example_2()

     Dim String1 As String
     Dim String2 As String

     String1 = ""
     String2 = "PHP"

     Debug.Print InStr(1, String1, "PHP", vbTextCompare)

End Sub
Return 0 when length of the first string is 0
Starting point is higher than length of first string
Sub Example_3()

     Debug.Print InStr(20, "run macro", "macro", vbTextCompare)

End Sub

Here the length of the first string is 9. But the start is set to 20. So the function will return 0.

Start is higher than the length of first string
Start is higher than occurrence position of the second string inside first string
Sub Example_4()

     Debug.Print InStr(8, "Check this Excel tutorial", "this", vbTextCompare)

End Sub

In this example, the InStr function is searching for the string “this” inside the first string. And string “this” appears at the position 7 of the first string. But as the start is set to 8 the function returns 0. Because the InStr function can’t find the substring “this” after position 8.

Return 0 when start is higher than the position of the second string inside the first string

Return Null

The InStr function returns Null on three occasions.

Return Null when first string is Null
Sub Example_5()

     Dim String1 As Variant
     Dim String2 As String

     String1 = Null
     String2 = "word"

     Debug.Print InStr(1, String1, String2, vbTextCompare)

End Sub

Here String1 has been declared as a variant because only the variant data type can hold Null values.

Return Null when first string is Null
Return Null when second string is Null
Sub Example_6()

     Dim String1 As String
     Dim String2 As Variant

     String1 = "Excel VBA Solutions"
     String2 = Null

     Debug.Print InStr(1, String1, String2, vbTextCompare)

End Sub

Here String2 is declared as a variant because only the variant data type can hold the Null values.

Return Null when second string is Null
Return Null when both first and second strings are Null
Sub Example_7()

     Dim String1 As Variant
     Dim String2 As Variant

     String1 = Null
     String2 = Null

     Debug.Print InStr(1, String1, String2, vbTextCompare)

End Sub
Return Null when both first and second strings are Null
Return Start

The InStr function will return the start value on one occasion.

Return Start when length of second string is 0
Sub Example_8()

     Dim String1 As String
     Dim String2 As String

     String1 = "Excel VBA Solutions"
     String2 = ""

     Debug.Print InStr(4, String1, String2, vbTextCompare)

End Sub

Here the Len(String2) is equal to 0. And the start is 4. So the function will return 4.

Return start when length of second string is 0
Return the position where the match is found

When the second string is found within the first string, the function will return the position of the first string where the second string is found.

Sub Example_9()

     Dim String1 As String
     Dim String2 As String

     String1 = "How to check if string contains another string"
     String2 = "to"

     Debug.Print InStr(4, String1, String2, vbTextCompare)

End Sub

Here the word “to” can be found at the fifth position of the String1. So the function will return 5. Note that the function also considers spaces when determining the position.

Function will return the position of the first string where the second string is found

VBA InStr Case Sensitivity

When you use the InStr function sometimes you may want to do case insensitive searches and sometimes case sensitive searches. So how do we control the case sensitivity? We can use the fourth parameter of the function to control the case sensitivity of the searches.

VBA InStr case insensitive search

In Excel VBA we can use one of the two values for the fourth parameter of the VBA InStr function. vbTextCompare or vbBinaryCompare. Because vbDatabaseCompare is only related to Microsoft Access. So far in our examples we used the vbTextCompare as the fourth parameter. If we use vbTextCompare as the fourth parameter, then the function will do case insensitive search.

Sub Example_10()

     Dim String1 As String
     Dim String2 As String

     String1 = "Excel VBA Solutions"
     String2 = "vba"

     Debug.Print InStr(4, String1, String2, vbTextCompare)

End Sub

Here the word “VBA” in uppercase in the String1 and “vba” in lowercase in the String2. As we have used vbTextCompare as the fourth parameter, the InStr function will do case insensitive search and will return 7.

VBA InStr case insensitive search
VBA InStr case sensitive search

So we learnt how to do case insensitive search using the VBA InStr function from the above example. We can use vbBinaryCompare as the fourth parameter to do case sensitive searches.

Sub Example_11()

     Dim String1 As String
     Dim String2 As String

     String1 = "Excel VBA Solutions"
     String2 = "vba"

     Debug.Print InStr(4, String1, String2, vbBinaryCompare)

End Sub

Here the word “VBA” is in uppercase in the String1 and “vba” is in lowercase in the String2. As we have used vbBinaryCompare as the fourth parameter, search will be case sensitive and function will return 0.

VBA InStr case sensitive search returned 0

Now let’s use the word “VBA” in uppercase in both strings and check how it works with the vbBinaryCompare option.

Sub Example_12()

     Dim String1 As String
     Dim String2 As String

     String1 = "Excel VBA Solutions"
     String2 = "VBA"

     Debug.Print InStr(4, String1, String2, vbBinaryCompare)

End Sub
VBA InStr case sensitive search for same uppercase

If the second string occurs multiple times.

Sometimes the second string can occur multiple times inside the first string. If this happens the InStr function will return the position of the first occurrence of the second string starting from the start point.

Sub Example_13()

     Dim String1 As String
     Dim String2 As String

     String1 = "Excel formulas, Excel macros and Excel charts"
     String2 = "Excel"

     Debug.Print InStr(1, String1, String2, vbTextCompare)

End Sub

In this example word Excel occurs 3 times inside the String1. As the start is 1, the InStr function will return the position of first occurrence which is 1.

Result when second string occur multiple times inside the first string and start is 1

Here are the same example strings with a different start.

Sub Example_14()

     Dim String1 As String
     Dim String2 As String

     String1 = "Excel formulas, Excel macros and Excel charts"
     String2 = "Excel"

     Debug.Print InStr(5, String1, String2, vbTextCompare)

End Sub

In this example the start is set to 5. So now the function will search for the word “Excel” inside the String1 from the fifth position onward. Therefore in this example, the function will return the position of the second occurrence of the word “Excel”.

When the second string occur multiple times and start is different than 1

How to use VBA InStr Function for list of strings

However in practical situations you may not need to check if one string contains a substring. Instead you may need to check if a list of strings contains a particular substring and output the results. So now let’s look at how to accomplish such a task with the help of the For Next statement.

Let’s consider this sample Excel sheet.

Sample worksheet

This sample Excel sheet contains a list of post titles of this blog in column A. I’m going to find which titles have the word “Excel” and write “Found” Or “Not Found” in column B. Let’s name the subroutine as CheckForWordExcel

Sub CheckForWordExcel()

End Sub

First we need to declare a few variables.

Dim WS As Worksheet
Dim PostTitle As String
Dim i As Integer

If the name of the worksheet is “Sheet1”, we can assign the sheet to the WS variable as follows.

Set WS = Worksheets("Sheet1")

Assume there are titles up to the 100th row. So we can use a For Next statement like this.

For i = 2 To 100

Next i

In each iteration we can assign the post titles to the PostTitle variable like this.

For i = 2 To 100
     PostTitle = WS.Range("A" & i).Value
Next i

Now we can use the InStr function to check whether the word “Excel” is available in each title.

InStr(1, PostTitle, "Excel", vbTextCompare)

Here the second string is “Excel” and the length of it is higher than 0. Therefore InStr function should return positive value only when substring “Excel” found inside the PostTitle. So we can use an If statement inside the For Next Loop like this.

For i = 2 To 100
     PostTitle = WS.Range("A" & i).Value

     If InStr(1, PostTitle, "Excel", vbTextCompare) > 0 Then
         WS.Range("B" & i).Value = "Found"
     Else
         WS.Range("B" & i).Value = "Not Found"
     End If
Next i

So here is the full code of the subroutine.

Sub CheckForWordExcel()

     Dim WS As Worksheet
     Dim PostTitle As String
     Dim i As Integer

     Set WS = Worksheets("Sheet1")

     For i = 2 To 100
         PostTitle = WS.Range("A" & i).Value

         If InStr(1, PostTitle, "Excel", vbTextCompare) > 0 Then
             WS.Range("B" & i).Value = "Found"
         Else
             WS.Range("B" & i).Value = "Not Found"
         End If
     Next i

End Sub

Sample result

Contact Form

Name

Email *

Message *