Want to become an expert in VBA? So this is the right place for you. This blog mainly focus on teaching how to apply Visual Basic for Microsoft Excel. So improve the functionality of your excel workbooks with the aid of this blog. Also ask any questions you have regarding MS Excel and applying VBA. We are happy to assist you.

How to Add Power Query to Excel Ribbon

In this post I will show you how to add  power query to Excel ribbon.

First, open the Excel application. Choose blank workbook.


So new workbook will be created. then click on the file menu.

Then click on the options.

Then Excel options window will pop up. Click on Add-Ins

Then select “Microsoft Power Query for Excel” and click OK.


Power Query tab will added to the Excel ribbon.

If "Microsoft Power Query for Excel" is not listed in Add-Ins list then you can download it from Microsoft website.

Search google for the Power Query.

Go to the download page. And click on the download button.

Then select the apropriate file to download according to the bit version.


Add a Command Button to an Excel Sheet


Today I am going to explain you how to insert a command button to an Excel sheet. First click on the developer tab.


Then click on the insert.

You will notice that there are two types of buttons available in VBA. One is form control buttons and other one is ActiveX control command buttons. There are few differences between these two types of buttons. Form control buttons compatible with any Microsoft Excel version. Also they are compatible with Mac OS too. But ActiveX control command buttons are not compatible with Mac OS. Also it is different how you can write codes for each of these button types. You can easily write codes for ActiveX control command buttons by double clicking on the button. But if you need to write the code for the form control button, first you need to develop the code on a separate module. Then you can right click on the form control button and assign macro.


So if you select the ActiveX control command button your mouse pointer will changed to + symbol. Then click on somewhere in the Excel sheet and drag the mouse to create a rectangle. 


Release the left mouse button. Then command button will be created like this.  


Next I will explain you how to change the name of the command button or any other property. First you need to right click on command button. Then select properties. 


You will see the properties window like this.

Now you can change properties like name, caption, background colour and font colour etc. from this window. And when you name the controls, it is a good practice to follow the conventional naming system. For an example if you want to name this command button as “Click” then you need to add cmd before the name. So the name will be “cmdClick”.

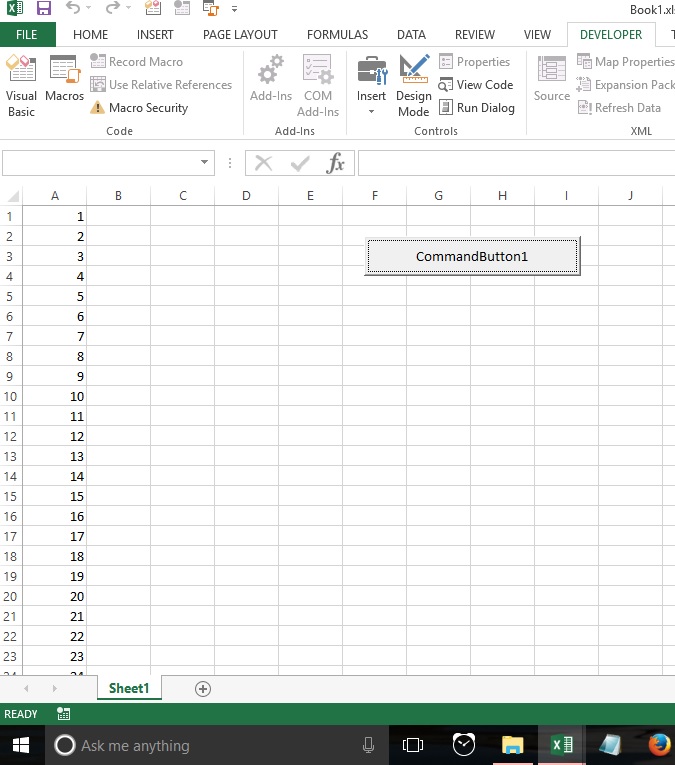
Next I will explain you how to add VBA code to ActiveX control command button. As an example let's write a code to type from 1 to 100,000 in column A of the Excel sheet. First click on the developer tab and select the Design mode.
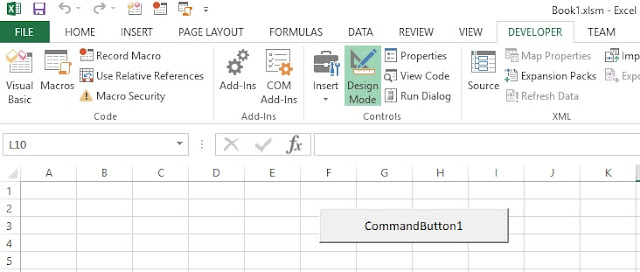


Now double click on the command button. Then VBA editor will be opened like this.
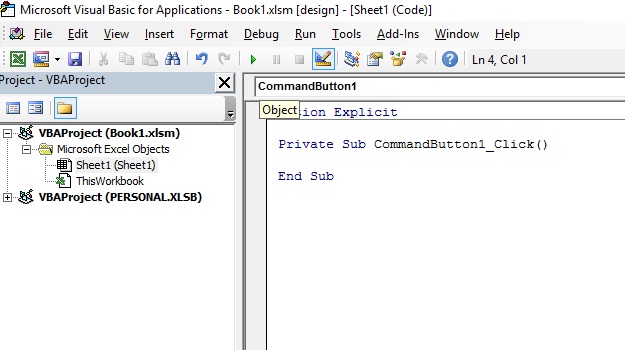


So you can add the below code to the command button.


Exit the design mode by clicking on it again. Then click the command button to run the program. You will get following result.


Use Textbox to Input Date in VBA

We often use VBA userforms to enter data. These userforms contain various types of controls such as combo boxes, textboxes, command buttons etc. Among them textboxes are a commonly used control type in userforms. So today I am going to explain you a cool trick you can use in VBA textboxes. This will be very useful when you use text boxes to input dates. we can enter dates in various formats such as dd/mm/yyyy, mm/dd/yyyy, mm/dd/yy etc. but there are situations where we need to tell our user to enter date in only particular format. So how we can give this message to our users. We can do it simply like this


When you show the form you can put date format inside the textbox. This can be done by assigning the relevant value to textbox in userform's initialise event. Below is the code you can use for that.

Private Sub UserForm_Initialize()

txtStart.Value = "DD/MM/YYYY"

End Sub

But it will be a little difficult if user need to delete this value every time he or she want to enter a date. Then your application won't be user friendly. So the best thing is to find a way to clear the textbox when user click on it. We can do this easily using textbox MouseDown event. Here below is the code you can use for that.

Private Sub txtStart_MouseDown(ByVal Button As Integer, ByVal Shift As Integer, ByVal X As Single, ByVal Y As Single)

If StrComp(txtStart.Value, "DD/MM/YYYY", vbTextCompare) = 0 Then

     txtStart.Value = ""

End If

End Sub

I will explain you why I have used if statement here. Sometimes user can unintentionally click on the textbox after entering the correct date. And sometimes user may need to correct a part of the date if he or she has entered it incorrectly. Because of that, we need to check the current value of the text box before clear it. So that's why I have used a if statement before clear the value. Then it will clear the value of the textbox only if it find DD/MM/YYYY.


Add Textbox to Excel Worksheet

In this post I will explain you how to insert Textbox to Excel worksheet. These are the steps you need to follow. First click on the developer tab. Then click on the insert menu in controls group.


When you click on the insert menu it will list types of control you can insert to the worksheet.

There are two types of controls. They are form controls and ActiveX controls. Text box is listed under activeX controls. However there's another control type call text field which is listed under form controls. But do not confused with this text field controls. Text Field controls always appear dimmed because they are unavailable in Excel workbooks.

So click on the text box control to add it to the worksheet.


Then you will notice that your mouse pointer will change to + symbol. Now left click somewhere on the worksheet And drag the mouse to create a small rectangle like this. 

Now release the left mouse button. When you release the button new Textbox will be created in the worksheet.


And when you create the Textbox you will notice that the Excel application automatically gives a name to that text box. However programmers use conventional naming method to name controls. So it is a good practice to follow that conventional naming method when you name the controls. For an example if you want to name this Textbox as username then you can name it as txtUsername.

Next I will explain you how to change name or any other property of a text box. First right click on the Textbox and click on the properties. 


Then you will see the properties window.

Now you can change name or any other property from this properties window. In a next post I will explain you how to change a value of Textbox from a command button.

How to use Find and replace function in VBA

Today I'm going to explain you how to use another very important excel sheet function in VBA. It is find and replace function. If you are an excel user, surely you may have use this function manually. But today I'm going to explain you how to use this excel sheet function in a VBA program/macro.

In Excel 2013, you can find this function (Find & Select) under "Editing" section of "Home" Tab. If you are using any other version, you will able to find it in a similar place.


If you click on the arrow head, this kind of dropdown list will appear.


Then click on the "replace". Then you will get this pop up window.


You may have use this window before to find and replace words in your excel sheets. But today I'm going to explain you how to use this function in a VBA program. Let's use below sample paragraph to test our code.

So let's try to replace word "excel" with word "Word".

Following is the equivalent VBA code to do the "find and replace" worksheet function.

Sub FindReplace()

Dim SearchText As String
Dim ReplacementText As String

SearchText = "excel"
ReplacementText = "Word"

Worksheets("Sheet1").Cells.Replace What:=SearchText, Replacement:=ReplacementText, LookAt:=xlPart, MatchCase:=False

End Sub

You will get this result after running the above code.


However there is a one small problem with above code. Consider the following example.


If we run the macro for above sheet, You will notice that word "excellent" will change to "Wordlent".

Because of that, this find and replace code has limitations. If you need to avoid above type of errors, then you will need advance solution than this.

How to scroll a web page number of pixels

In this post, I'm going to explain how to scroll a web page number of pixels you need. There are various types of websites. Lot's of these websites have an option to search for information. Normally there is a text box to input search word or phrase and then there is a "search" button to click. When we search for something in a website, some websites list the results in number of pages. So we need to go to each page to find the information.

But some websites do not show results in several pages. Instead they show all the results in one page. But if there are lots of results then these websites only load small part of the complete result. They loads the other data part by part while we scroll through the page.

So if we need to write a program to get data automatically from a website where results are shown in different pages, we can do that by commanding the program to navigate to each page. For some websites we can do this by just changing the number in the address of page.

But how we collect the data from a website which loads the data only when we scroll. Here is the solution. We can write a code to scroll a web page number of pixels. You can use below code for that. It will scroll a page 100 pixels.

'Scroll web page 100 pixels down
objIE.Document.parentWindow.scrollBy 0, 100

But there will be a limit of pixels you can scroll at once. For an example if you command the page to scroll for 100000 pixels, it won't do that. It will only scroll a amount, what  it normally scroll per one time when do manually. However if you want to scroll long range, you can do that by commanding the page to scroll several times like this.

'Scroll the page 10 times
For i = 1 To 10
    objIE.Document.parentWindow.scrollBy 0, 100000 * i
    Application.Wait (Now + TimeValue("0:00:03"))
Next i

Please note that objIE in above examples refers to "InternetExplorer.Application" object.

Change attributes of controls inside VBA userforms in easier way

Sometimes we need to use set of similar controls when developing applications with userforms. For an example we may need to use set of labels, dropdowns or textboxes etc inside a vba userform. If we have similar set of controls like that, then there are situations we may need to change the values or visibility of the controls according to the various logics and conditions.

Let's look at the following example.

Here we have 4 labels and 4 combo boxes. Sometimes we need to control the attributes of these controls or change the values of controls. If we give random names for each control then we need to control their attributes one by one or we need write one line per each control to change their values. But if we have similar set of controls and we name them simila manner, then we can change the attributes or values of the controls using a For Next loop. So for above example we can name lables like lblCycle1, lblCycle2, lblCycle3 and lblCycle4. And we can name combo boxes as cboScore1, cboScore2, cboScore3 and cboScore4. Then we can change the attributes as follows.

Dim i as Integer
Dim NumberOfCycles as Integer

For i = 1 To NumberOfCycles
    UserForm2.Controls("lblCycle" & i).Visible = True
    UserForm2.Controls("cboScore" & i).Visible = True
Next i

In above example, variable "NumberOfCycles" equal to how many pairs of labels and combo boxes we need to show in userform2.

Contact Form

Name

Email *

Message *