Want to become an expert in VBA? So this is the right place for you. This blog mainly focus on teaching how to apply Visual Basic for Microsoft Excel. So improve the functionality of your excel workbooks with the aid of this blog. Also ask any questions you have regarding MS Excel and applying VBA. We are happy to assist you.

Find function

Think you have a spread sheet similar to this. It contains value "100" in several cells.

So today I will teach you how to get the address of those cells from VBA code

First let's define the value we need to search.

Dim s1 As String

Then assign the value we search to that variable.

s1 = "100"

And it is a good practice to use objects where you can. It prevent occurrence of errors. Think you have worksheet call "Report". If you use conventional way you need to refer that sheet by worksheets("Report") at every where you needed to refer it. But if you use worksheet object you can refer it from very short name. So this will give neat look to your coding as well. So I prefer using objects. So use worksheet objects as follows.

Dim WS As Worksheet
Set WS = Worksheets("sheet1")

Then Set the range we need to search.

With WS.Range("A1:T23")

Following line of code will give you the address of each cell having 100 in it.

MsgBox c.Address

Loop will continue until it find a value for c except first value.

Loop While Not c Is Nothing And c.Address <> firstAddress

So here is the full code. You can use this wherever you need by changing the sheet names, range and search values accordingly. Also you can pass the search value as a variable.

Dim s1 As String
s1 = "100"
Dim WS As Worksheet
Set WS = Worksheets("sheet1")
With WS.Range("A1:T23")
    Set c = .Find(s1)
    If Not c Is Nothing Then
        firstAddress = c.Address
        Do
            MsgBox c.Address
            Set c = .FindNext(c)
        Loop While Not c Is Nothing And c.Address <> firstAddress
    End If
End With

With the above code you will get the cell address of cells having "100" to msgboxes.

Populate combo box with sheet name of opened work book

Here cboFromSheeet is the name of the combo box.

Dim wbFrom As Workbook
Set wbFrom = Application.Workbooks.Open(lblFromFilePath.Caption)
Dim ws As Worksheet

'Clear the combo box
cboFromSheeet.Clear

With cboFromSheeet
    For Each ws In Worksheets
            .AddItem ws.Name
    Next ws
End With

cboFromSheeet.Text = "Select a Sheet"

Add work sheet with a name

Think you want to add a worksheet with a name "Report"

This code will do it.

Sheets.Add.Name = "Report"

However you can do this even with objects

See following code

Dim WS as Worksheet
Set WS = Sheets.Add

You can refer this new sheet by WS wherever at the code. You don't need to know anything about like it's name, location etc. Even you can give it a name later.

For an example think you want to name it as "Calculation". So below code will do it.

WS.Name = "Calculation"

Find last row having data in a certain column

    Dim LastRow As Long
    With ActiveSheet
        LastRow = .Cells(.Rows.Count, "A").End(xlUp).Row
    End With

reference workbooks and sheets Explicitly

This example shows how to reference workbooks and sheets explicitly.

Dim wbFrom As Workbook
Dim wbTo As Workbook
Dim wsFrom As Worksheet
Dim wsTo As Worksheet
Dim Str1, Str2, s1, s2, s3, s4 As String
'paths of 2 workbooks
Str1 = lblFromFilePath.Caption
Str2 = lblToFilePath.Caption
Dim WrdArray() As String
WrdArray() = Split(Str1, "\")
's1 and s2 are Workbook names
s1 = WrdArray(UBound(WrdArray()))
WrdArray() = Split(Str2, "\")
s2 = WrdArray(UBound(WrdArray()))
'Worksheet names
s3 = cboFromSheeet.Value
s4 = cboToSheet.Value

Set wbFrom = Workbooks(s1)
Set wbTo = Workbooks(s2)
Set wsFrom = wbFrom.Worksheets(s3)
Set wsTo = wbTo.Worksheets(s4)

If cboFromSheeet.Text <> "Select a Sheet" And cboToSheet.Text <> "Select a Sheet" Then
    MsgBox wsFrom.Name, , "from"
    MsgBox wsTo.Name, , "To"
Else
    MsgBox "Please select relevant sheets from the drop down menu.", vbOKOnly, "WARNING!"
End If

Browse File And Assign Full Path And Name Into Two Variables

This Excel VBA tutorial explains how to use file browsers in Excel VBA applications. In Excel VBA applications, we often need to let the user input data from various files to the application. If we know the file path then we can directly use that path in the code to open the file. But this method is not practicable because we can’t ask the users to open the VBA editor and change the codes. Also it will be impossible if you lock the source code. Therefore using a file browser is the ideal solution for that kind of requirement.


File browser window

If the application has a file browser option like above, then users can easily select files to upload the data. So let’s look at how to add a file browser option to a VBA application. Let’s name this subroutine as “SelectFile”

Sub SelectFile()

End Sub

First we need to declare a few variables.

Dim strFile As String
Dim FullPath As String
Dim FileName As String
Dim WrdArray() As String

Next we can show the “Open dialog box”. So the user can select a file.

sFile = Application.GetOpenFilename("Excel workbooks,*.xls*")

Now we need to check whether the user clicked on the “Open” button or the “Cancel” button. We can use a If .. Then .. Else Statement to determine that.

If sFile = "False" Then
     'If user click "Cancel" button
Else

End If

If the user clicks on the “Cancel” button then we should exit the subroutine using “Exit Sub” statement. Otherwise the program will be executed to the file opening section and produce an error. If the user clicks on the “Open” button, sFile will contain the full path of the file. So we can assign it to the FullPath variable as follows.

FullPath = sFile

Now the remaining task is to extract the name of the file from the sFile variable. We can use the Split function to get that job done. Name of the file will occur after the last “\” character. So we can split the sFile string using “\” as a delimiter and then get the last element of the result array.

WrdArray() = Split(sFile, "\")
FileName = WrdArray(UBound(WrdArray()))

Want to learn about Split function? Read this post => Split Function

Now complete If .. Then .. Else block should look like this.

If sFile = "False" Then
     'If user click "Cancel" button
     Exit Sub
Else
     FullPath = sFile
     WrdArray() = Split(sFile, "\")
     FileName = WrdArray(UBound(WrdArray()))
End If

Finally we can open the file and assign it to the WB variable as follows.

Set WB = Workbooks.Open(FullPath)

Note that the full path is enough to open the file. But knowing the file name can be useful for some other purposes. Below is the full code for the “SelectFile” subroutine.

Sub SelectFile()

    Dim WB As Workbook
    Dim strFile As String
    Dim FullPath As String
    Dim FileName As String
    Dim WrdArray() As String

    sFile = Application.GetOpenFilename("Excel workbooks,*.xls*")

    If sFile = "False" Then
         'If user click "Cancel" button
         Exit Sub
    Else
         FullPath = sFile
         WrdArray() = Split(sFile, "\")
         FileName = WrdArray(UBound(WrdArray()))
    End If

    Set WB = Workbooks.Open(FullPath)

End Sub

In the above example we let the user to only select the Excel files. If you want to allow the user to select any file type then replace “sFile = Application.GetOpenFilename("Excel workbooks,*.xls*")” with below line.

sFile = Application.GetOpenFilename()

And sometimes you may want to permit users to only select CSV files. Use the below code in that case.

sFile = Application.GetOpenFilename("CSV files,*.csv")

In this lesson we considered selecting only one file. But you can use the “GetOpenFilename” method to select multiple files as well. But then it will return an array (array will contain names of the selected files.) instead of a string.

Open a closed work book

Application.Workbooks.Open ("E:\Blogger Folder\My Files\Folder1\Calculations.xls")

Replace string inside a string by another string

Dim s1,s2,s3 As String
s1 = "abcabcabc"
s2 = Replace(s1, "a", "b")
s3 = Replace(s1, "bc", "a")

You will get below answers

s2= bbcbbcbbc
s3= aaaaaa

Open Word Document with Excel VBA

In this lesson you will learn how to open an existing Word document or create a new Word document with Excel VBA. This involves several key steps. Below is a detailed guide to help you navigate this process effortlessly.

1. Accessing the VBA Editor

First you need to access the VBA editor inside your Excel application.

Open your Excel workbook. Press Alt+F11 to access the Visual Basic for Applications (VBA) editor.

VBA Editor

2. Configuring References

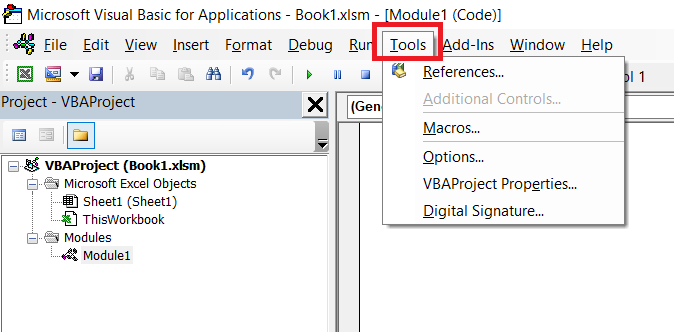
Once you are inside the Visual basic environment, then you need to add reference to the Microsoft word object library.

Navigate to the "Tools" menu.

Click on Tools Menu

Select "References" from the dropdown list.

Select References

Ensure that the "Microsoft Word xx.0 Object Library" is checked by ticking the checkbox.

Add reference to the Microsoft Word xx.0 Object Library

This step allows Excel VBA to interact with Word documents seamlessly.

3. Inserting VBA Code

In the VBA editor, locate the module where you want to insert the code or create a new module. Copy and paste the following VBA code into the module.

Sub OpenExistingWordDocument()

   Dim wApp As Word.Application
   Dim wDoc As Word.Document

   'Create a new instance of the Word application
   Set wApp = CreateObject("Word.Application")
   wApp.Visible = True ' Make the Word application visible

   'Open an existing Word document from your hard drive
   Set wDoc = wApp.Documents.Open("D:\VBA LAB\Result.docx")

End Sub

This subroutine will open an existing Word document located at the specified file path ("D:\VBA LAB\Result.docx"). Modify the file path in the Open() method to point to the location of your specific Word document. Below is the detailed explanation of the code.

Dim wApp As Word.Application

This line declares a variable named wApp as an object of type Word.Application. It is used to represent an instance of the Microsoft Word application.

Dim wDoc As Word.Document

This line declares another variable named wDoc as an object of type Word.Document. It will be used to represent a specific Word document.

Set wApp = CreateObject("Word.Application"):

Here, a new instance of the Word application is created using the CreateObject function. The "Word.Application" parameter specifies that we want to create an instance of the Word application. The Set keyword assigns this newly created instance to the wApp variable.

wApp.Visible = True:

This line sets the Visible property of the Word application to True. It ensures that the Word application window is visible to the user when it is opened.

Set wDoc = wApp.Documents.Open("D:\VBA LAB\Result.docx"):

This line opens an existing Word document located at the specified file path. The Set keyword assigns the opened document to the wDoc variable. The Documents.Open method is used to open the document within the Word application instance represented by wApp.

In summary, this code initializes variables for representing the Word application (wApp) and a specific Word document (wDoc). It then creates a new instance of the Word application, sets it to be visible, and opens an existing word document.

If you want to create a new word document instead of opening an existing word document, then you can slightly modify the above code as follows.

Sub CreateNewWordDocument()

   Dim wApp As Word.Application
   Dim wDoc As Word.Document

   'Create a new instance of the Word application
   Set wApp = CreateObject("Word.Application")
   wApp.Visible = True ' Make the Word application visible

   'Create a new Word document
   Set wDoc = wApp.Documents.Add

End Sub

In this subroutine, only difference is we have

Set wDoc = wApp.Documents.Add

Instead of

Set wDoc = wApp.Documents.Open("D:\VBA LAB\Result.docx")

This new line creates a new Word document by adding a document to the Documents collection of the Word application (wApp).

Get path of a workbook

Following code will show the path of the active work book in a message box

MsgBox ActiveWorkbook.Path

Clear the value of a text box when click on it

Some times we need to clear the text box when click on top of it.

Ex - Enter date to a text box which displays "Date" on it.

So you have to put the code to MouseUp event of the text box. Below is the code for a date text box

Private Sub txtBDate_MouseUp(ByVal Button As Integer, ByVal Shift As Integer, ByVal X As Single, ByVal Y As Single)

If txtBDate.Text = "Date" Then
    txtBDate.Text = ""
End If

End Sub

Add data set to next empty row of an excel database

When we create data entry applications in Excel, we need to save data to Excel sheets from VBA forms. Then we can access those stored data later through forms. And we can also use those stored data to generate reports or dashboards as required. So how do we transfer data from VBA forms to Excel sheets? We can’t use the macro recorder to find out this. This needs a custom VBA code. So in this lesson you can learn how to save data from a VBA form to the next empty row of a worksheet.

Let’s consider this sample VBA form.

Sample form

This form has 7 text fields. Names of the textboxes are as follows.

Field NameTextbox Name
Order NumbertxtOrderNumber
SizetxtSize
Serial NumbertxtSerialNumber
Project NumbertxtProjectNumber
TypetxtType
DatetxtDate
SurveyortxtSurveyor

Name of the “Enter” button is cmdEnter. When the user fills the data and clicks the “Enter” button, data should be transferred to the next empty row of the sheet below.

Excel database

Now let’s look at how to create the code for the “Enter” button. First we need to declare a few variables.

Dim WS_Data As Worksheet
Dim LastRow As Long
Dim NextRow As Long

Name of the worksheet is “Data”. So we can assign the worksheet to the WS_Data variable as follows.

Set WS_Data = Worksheets("Data")

Next we need to find the row number of the last cell having data. We can get it as follows.

'Find last row
LastRow = WS_Data.Cells.Find("*", [A1], , , xlByRows, xlPrevious).Row

Now the variable “LastRow” contains the row number of the last cell with data. Then we can get the next row easily like this.

NextRow = LastRow + 1

After that we can write the data from VBA form to the worksheet as follows.

'Enter data to "Data" sheet
WS_Data.Range("A" & NextRow) = txtOrderNumber.Value
WS_Data.Range("B" & NextRow) = txtSize.Value
WS_Data.Range("C" & NextRow) = txtSerialNumber.Value
WS_Data.Range("D" & NextRow) = txtProjectNumber.Value
WS_Data.Range("E" & NextRow) = txtType.Value
WS_Data.Range("F" & NextRow) = txtDate.Value
WS_Data.Range("G" & NextRow) = txtSurveyor.Value

Then we should clear the form after entering the data. So users can enter the next data set to the excel database through VBA form. You can use the below code to clear the textboxes.

'Clear the textboxes
txtOrderNumber.Value = ""
txtSize.Value = ""
txtSerialNumber.Value = ""
txtProjectNumber = ""
txtType.Value = ""
txtDate.Value = ""
txtSurveyor.Value = ""

Finally we can save the workbook and tell the user that data is saved.

ActiveWorkbook.Save
MsgBox "Data saved successfully!", vbInformation, ""

Here is the full code for the “Enter” button.

Private Sub cmdEnter_Click()

Dim WS_Data As Worksheet
Dim LastRow As Long
Dim NextRow As Long

Set WS_Data = Worksheets("Data")
'find last row
LastRow = WS_Data.Cells.Find("*", [A1], , , xlByRows, xlPrevious).Row
NextRow = LastRow + 1

'Enter data to "Data" sheet
WS_Data.Range("A" & NextRow) = txtOrderNumber.Value
WS_Data.Range("B" & NextRow) = txtSize.Value
WS_Data.Range("C" & NextRow) = txtSerialNumber.Value
WS_Data.Range("D" & NextRow) = txtProjectNumber.Value
WS_Data.Range("E" & NextRow) = txtType.Value
WS_Data.Range("F" & NextRow) = txtDate.Value
WS_Data.Range("G" & NextRow) = txtSurveyor.Value

'Clear the textboxes
txtOrderNumber.Value = ""
txtSize.Value = ""
txtSerialNumber.Value = ""
txtProjectNumber = ""
txtType.Value = ""
txtDate.Value = ""
txtSurveyor.Value = ""

'Save workbook
ActiveWorkbook.Save
MsgBox "Data saved successfully!", vbInformation, ""

End Sub

Add names of all open workbooks to a combo box list

In this post I’m going to show you how to add names of all opened workbooks to a dropdown list. We can develop macros to automate various tasks. Sometimes you may need to let the user run a macro for a specific Excel file from the all opened Excel files. So it enables the user to do changes or formatting to that specific file. But then how can the user select the file to run the macro? To solve this we can develop a user friendly method by creating a VBA form with a dropdown like this.

Dropdown to add names of all the open workbooks

Then you can add the below code to the initialize event of the userform. Name of the combobox (dropdown) is “cboFileName”.

Private Sub UserForm_Initialize()

     Dim WB As Workbook

     For Each WB In Application.Workbooks
          With cboFileName
               .AddItem WB.Name
          End With
     Next WB

End Sub

See the form in action below.

Completed form
Names of all the opened Excel files are in dropdown list
One file selected

Now you can call the subroutine through the OK button. Assume you want to run the subroutine called “RemoveEmptyRows” for this file. If the name of the OK button is cmdOK we can write the code for the OK button like this.

Private Sub cmdOK_Click()

     Dim WB_Selected As Workbook

     Set WB_Selected = Workbooks(cboFileName.Value)

     Call RemoveEmptyRows(WB_Selected)

End Sub

Now you can place the RemoveEmptyRows subroutine inside the same form or inside a module.

Sub RemoveEmptyRows(WB As Workbook)

     …………………...
     More codes here
     …………………...

End Sub

Function to returns column name from col number

This function will return column name if you input column number.

for example if you want to get column name of 100 th column

you can use ReturnColumnName(100)

Answer will be CV

Function ReturnColumnName(ByVal number As Integer) As String
    ReturnColumnName = Split(Cells(, number).Address, "$")(1)
End Function

How to get a discription of an error

On Error Resume Next
-------------------------------
Your code goes here.( ex: Mail.Send)
-------------------------------
If Err.Number <> 0 Then
    MsgBox Err.Description, vbCritical, "There was an error"
    Exit Sub
End If

Cell address of a cell having a specific data

MsgBox Cells.Find(What:="Deposit", After:=ActiveCell, LookIn:=xlValues, LookAt:= _
    xlWhole, SearchOrder:=xlByRows, SearchDirection:=xlNext, MatchCase:=False _
    , SearchFormat:=False).Address

Open save as dialog box with a file name

Some times we need to show save as dialog box for the user. Some times we need to show it with a  file name. Below is a code for that.

Dim IntialName As String
Dim fileSaveName As Variant
InitialName = "Result"
fileSaveName = Application.GetSaveAsFilename(InitialFileName:=InitialName, _
     fileFilter:="CSV (Comma delimited) (*.csv), *.csv")

Populating 3 combo boxes

Populating 3 combo boxes  cboYBrand, cboYName and cboColor from values from rows 2 to 10 of columns A,B and C

'Populating cboYBrand, cboYName and cboColor
If Worksheets("Database").Range("A2").Value <> "" Then 'if there is atleast one data row
        For i = 2 To 10
            With cboYBrand
                .AddItem Worksheets("Database").Range("A" & i).Value
            End With
            With cboYName
                .AddItem Worksheets("Database").Range("B" & i).Value
            End With
            With cboColor
                .AddItem Worksheets("Database").Range("C" & i).Value
            End With
        Next i
End If

Contact Form

Name

Email *

Message *